Wednesday, June 30, 2010

[Wacky Wednesday: Patriotic Crafts]

This week I figured I would feature some fantastic blog posts about fun patriotic DIY crafts that so many of you fabulous crafters out there have created. And given that Independence Day in the U.S. is this coming Sunday (ahh!), I figured it would be appropriate. So sit back, grab a cup o' Joe, and be inspired!

Crafts & Sutch created this adorable hanging USA sign that I am so wanting to make myself. Cute!!

Little Bit Funky made this festive July 4th t-shirt out of fabric and Wonder Under (I love that stuff!). She even has a step-by-step tutorial. Check it out!

Sweet Something Designs frugally made this American flag sign out of an old wooden pallet. Can you believe it? I think it looks amazing! So patriotic!


The Paisley Cupcake made this cute little "flag" by painting mason jars and decorating them with raffia. What a neat idea! And definitely a good way to recycle glass jars!

Tuesday, June 29, 2010

[How-to Tuesday: Numbered Jars]


Well, I am finally hopping on the bandwagon of making numbered jars. They have become quite the trend lately. They are very stylish and create instant order for any type of clutter you may have around your home. And if you have been wanting to have these fashionable numbered jars, then you've come to the right place. :0)


Many of you may have already seen these jars from Pottery Barn. You could buy them for about $40, if you enjoy spending your money. But if you are as frugal as I am and get a thrill out of saving a buck or two, then you could easily create them yourself.


Supplies needed:
3 jars of any size and style
printer paper or sticker paper
tape (if you are using printer paper)
black paint (I used fabric paint...it was all I had!)
small sponge brush

[These jars sit on a shelf that my hubby built right above the washer/dryer. The large jar holds detergent, the medium jar holds stain remover (a lifesaver for moms with messy toddlers), and the small jar holds fabric softener sheets.]

Step 1: Open up a word document and type the numbers "1", "2", and "3". Select the desired size and font for your jars. Print them out and cut out only the number to create a template (example shown below).


Step 2: Tape the template onto the jar (or if you are using sticker paper, then just peel and stick). Try to center it as much as you can. Don't worry if it's a little off. It's meant to have a "rustic" look. :0)


Step 3: Begin painting the black paint on the jar. Let dry.


Step 4: Carefully peel off the template once the paint has completely dried. If you are using fabric paint, then some of the paint might peel off with the template, so be very careful. If yours looked as rough as mine did, then just scrap off the paint around the edge of the number to clean it up a bit.


Step 5: Step back and admire your work because you are done!


I am quite pleased on how it all came together. It really fits into the decor of my laundry room nicely. I could always "distress" them later to give it more of a worn out look. Plus, I didn't have to spend $40! Score!! Happy Tuesday!

Oh, and please feel free to check out another fabulous blog over at Lemon Tree Creations that did something similar. I found them very inspirational. :0)

Monday, June 28, 2010

[Motivational Monday: EAT signs]

For months I have been seeing more and more "EAT" signs popping up in people's kitchens and dining rooms. They have certainly become the latest trend in wall decor. And I am so loving it! I am wanting to create one myself, but I just had to check around to give me some inspirational ideas.


I am wanted to do something similar to this EAT sign that I found on Etsy. I adore the different patterns and embellishments. So cute!


I bought these chipboard letters a couple weeks ago from Hobby Lobby. I cannot wait to decorate them and hang them in my dining room! Stay tuned for the finished product! :0)

Monday, June 21, 2010

My First Blogger Award!!!


(ahem) I'd like to thank the academy...

AHHH! I am so excited! Heather over at Straight Stitches just awarded me my first blogger award! I can't believe it! When you get a chance, head on over to her super cute blog. She has some amazing craft ideas that are very inspiring.

Guidelines for accepting this award are:
1. Thank the person/people who gave it to you.

Thank you Heather at Straight Stitches!!! I feel so special and so loved!
2. Share 7 things about yourself.


  • My husband and I met at our highschool prom.

  • We have a 20 lb. yorkie named Snickers. Yes, that's right, 20 pounds!!

  • I have recently become OCD with crafts, organizing, etc.

  • When I point to a picture of my husband, my 18 month old daughter says "dada". When I point to a picture of myself, she says "dada". Something's wrong with this picture...

  • While blogging, I always have to sit on my right foot. Not the left foot. Otherwise I would feel completely off-balance.

  • I have performed at the Macy's Thanksgiving Day Parade in NY, The Indy 500, and on a couple of Carnival Cruises while I was dancing in my highschool and college drill teams. I'm so famous!

  • The very first boyfriend I ever had is the man I am married to now. He is my first and last kiss. Aww...
3. Pass the award on to 15 bloggers, whom you have recently discovered, and think are fantastic.

Sunday, June 20, 2010

Happy Father's Day!

Thought this picture was just too funny...

Happy Father's Day to all those fun-loving dads out there!

Friday, June 18, 2010

[Frame Friday: Flower Frame]


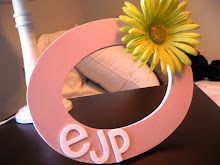
Welcome to another Frame Friday! I finally finished a frame I have been wanted to do for my daughter's room. I wanted it to have a "young girl" feel to it.

So I started out with an unfinished wooden frame I bought at Michael's for $1. I really liked the oval shape.


First I sanded down any rough edges, primed it, and painted it a rosy pink. Then I took some clear glaze from a spray can and sprayed then entire frame generously. I wanted it to be extra sealed so that it would be easier to clean.


After adding a green silk daisy and some foam letter scrapbook stickers, I was finally finished! Now I realize that this all could have taken me under an hour to finish (including drying time), but with a toddler and numerous other projects lying around, I got distracted. Somehow that always happens. :0)

Happy Friday!


The Girl Creative


Free Printables: Father's Day Gift Tags


Father's Day is literally around the corner (day after tomorrow...AHH!). So I wanted to share some fun tags that will give your Father's Day gift a little something special. BONUS: you can print it out for free!

The Scrap Shoppe was gracious enough to give everyone a freebie for Father's Day. Go visit her site and download the pdf to print of these adorable tags.

Here are some examples of how I used them. Don't you just love the bright colors?!


I cut out the pennants, punch a couple of holes at the top corners, and strung them together with a piece of twine. So simple!


Get a solid color back, cut out a tie with some patterned scrapbook paper, and adhere the tie to the bag with dimensional adhesive. Then add the cute little tag. :0)


You can also use the tags on cards, cupcake toppers, etc. Here I used it on a coupon book I made for my hubby. So cute and easy peasy!

Hope everyone has a fabulous Father's Day weekend!!

Monday, June 14, 2010

[Motivational Monday: Movie Set Decor]

Do you ever catch yourself paying more attention to the decor of a movie set than the actual plot of the movie? Well, I find myself do more and more of that these days. I am completely distracted by the admirable interior/exterior design of houses in a movie. Just wishing that someday I will have a house just like that.

This past weekend I was watching The Holiday. I know what you're thinking..."it's June. why on earth is she watching a Christmas movie??" Well, I believe this movie can and should be watched all year long. And, as always, I cannot take my eyes off the interior decor. It's just...well, mesmerizing. Feel free to look for yourself. {swoon...}

First the house in L.A.:

The living room

The kitchen

The bathroom (which I don't ever remember seeing in the film)

The bedroom

Then the beautiful cottage:

The living room

The kitchen

The bathroom (love that tub!)

The bedroom

You can view more images here. Enjoy! :0)

Thursday, June 10, 2010

[Transformation Thursday: Little Girl's Closet]

Well, I have officially begun the transformation. I am starting to work on my daughter's new room as she transitions out of the crib and into her "big girl bed". I know, such a sad day to realize my baby is no longer a baby...


So first things first...paint, paint, paint! The paint we used to paint the room is called "Silver Threads" by Olympic. I wanted it to be a neutral color (other than brown, beige, etc.) that she can keep well into her teenage years. But when I started painting it on the wall, it had sort of a bluish tint to it. Not sure if I like that or not. We'll see if it grows on me. But my main focus was to set up her closet. After removing her door and knocking down a wall, this is what it looked like:


After painting the walls:


Completely bare I know. But full of possibilities! Then (my favorite part!) it was time to decorate. We put up some wooden shelves we bought a Lowe's and staggered them so that there's room for her long hanging stuff. And I put some sheer curtains on a dowel rod in place of the "door". Maybe this will give her motivation to keep her closet tidy! (hey, a mom can dream, right?) So here's what it looks like now:


I know I am going to be changing it up a bunch of times (due to my decorating ADD), but I am pleased with where it is all going. Oh, and I also wanted to share with you a chandelier that I bought from Goodwill for 10 bucks. Just picture it gold and extremely ugly. Got the picture in your mind? Okay, now see the transformation:


Don't you just love the little glass ball in the center? Totally gives it character!


Just a few coats of glossy white spray paint later! Oh and I also got the lamp shades at Goodwill for $1.99 each. I spotted them at Lowe's for $6.99 each. Ahh...don't you just love that feeling of saving money? :0) Bonus: I got a cute little lamp + lampshade for 7 bucks at Goodwill, too! (can ya tell I love Goodwill?) I love it that it matches the chandelier.


So that's just part of what I am doing in my daughter's room. I am having fun with it, but I know it will take some time. My goal is to be finished with it by the end of the summer.

PREVIEW:
Isn't this just a darling set of table and chairs?? It was mine when I was a little girl, so I am passing it on to my little girl. :0) But it is in desperate need of a paint job. Stay tuned for later posts about this!!

The Girl Creative